Using Sypher Cookie Consent via Google Tag Manager
by Sypher | Published in Resources
Integrating Sypher Cookie Consent via Google Tag Manager is user-friendly and requires minimal technical expertise, making it accessible even for those with limited coding knowledge. Additionally, Sypher’s integration supports Google Consent Mode, enabling your Google Analytics and Google Ads to function effectively while respecting user privacy choices. With Sypher and Google Tag Manager, you can effortlessly maintain compliance, improve data accuracy, and build trust with your users.
Step by step guide to setting up the Sypher Cookie Consent Tag Template for Google Tag Manager, including Google Consent Mode v2.
Step 1 - Tag Installation
- In the Tags section of your workspace, click "New".
- In the window that opens, click on "Tag Configuration", then select "Discover more tag types in the Community Template Gallery".
- Search for "sypher" in the Gallery, open it, and click "Add to workspace".
- Confirm that you want to add a community template.
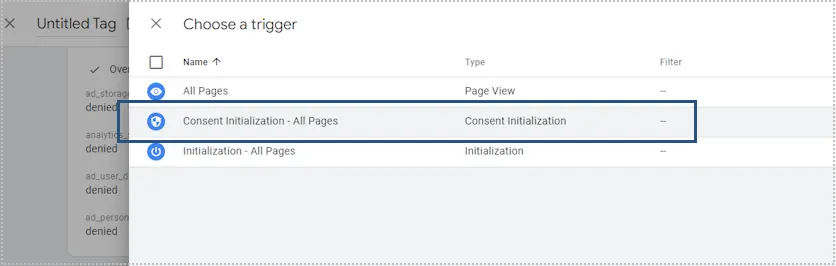
Step 2 - Tag Triggering
- On the new tag configuration page, click on the "Triggering" section
- Select the trigger "Consent initialization - All pages"
Step 3 - Tag Configuration
- The main variable for your tag is the website UUID. To obtain your website UUID, you need to have a Sypher account. If you already have access, find your website UUID in the "Integration" section. If not, start a free trial to get access.

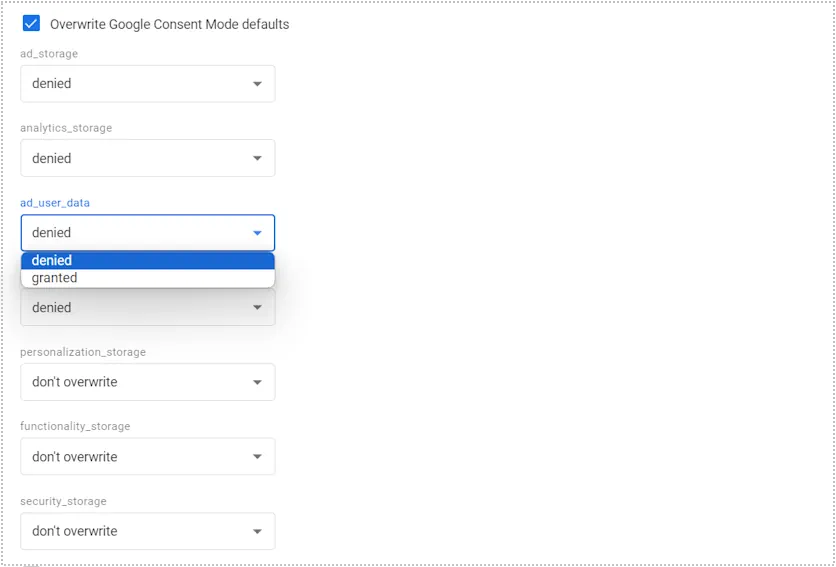
- For Google Analytics or Google Ads, support for Google Consent Mode v2 is required. Sypher automatically handles this, and you can enable it anytime. When active, Sypher Cookie Consent integration sends the default Google Consent Mode settings for the page. To overwrite these defaults, click "Overwrite Google Consent Mode defaults" and set your preferred settings for any of the supported tags: ad_storage, analytics_storage, ad_user_data, ad_personalization, personalization_storage, functionality_storage and security_storage.
- The option "Use tag in test mode" is reserved for testing and debugging.
- In the Advanced settings of the Tag Configuration section, set a high number for the "Tag firing priority" to ensure this tag fires first. The number depends on your workspace's existing tag settings. For example, you might use 999 if other tags have a lower firing priority.
- Click "Save", name your tag or use the default suggested name, and confirm the save.
Step 4 - Testing
- Test your new tag to ensure the Sypher cookie consent banner is shown on your page by clicking on "Preview" button in your Workspace.
- If everything is working correctly, publish your changes by clicking "Submit" and creating a submission version.
If you encounter any issue or have suggestions, you can contact us directly through Sypher > Contact us. Our technical team will prioritize your request and respond promptly.


